python开发环境

python开发后端是最入门的开发(个人觉得),因为python语法简单,第三方库完善,可以轻松胜任后端和机器学习的工作,因此以下便从python的web后端开发、桌面应用开发、安卓应用开发三个方面开始入手,人工智能先不做赘述,之后另开专题讲解。

版本控制

在有些时候,python的使用有特殊的版本要求,比如python2和python3,python3.6和python3.7-3.9和python3.10-~的有些库存在版本要求,这样的话对python的版本的控制便有了要求。以下推荐三种方法来进行版本控制:

  1. 不厌其烦的手动切换环境变量
  2. 通过相关的python库搭建虚拟环境,如virtualenv
  3. 通过Anaconda搭建虚拟环境

不同的使用情景有不一样的选择,以下举例做一些演示:

当需要手动切换环境变量的情景:CTF中py2和py3的切换、kali的py升级等

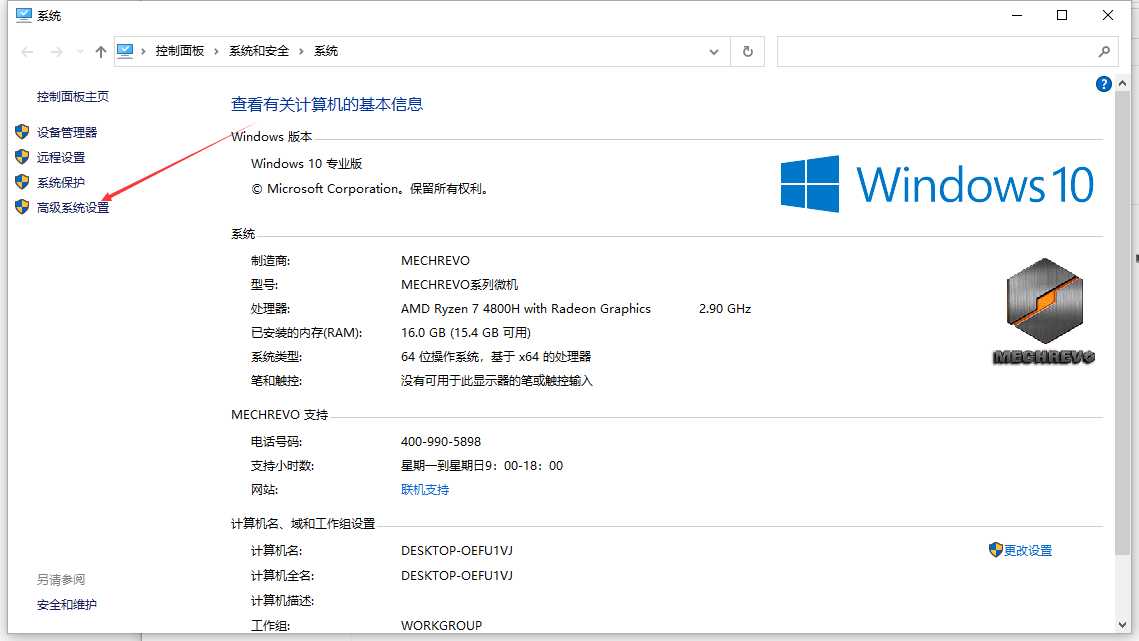
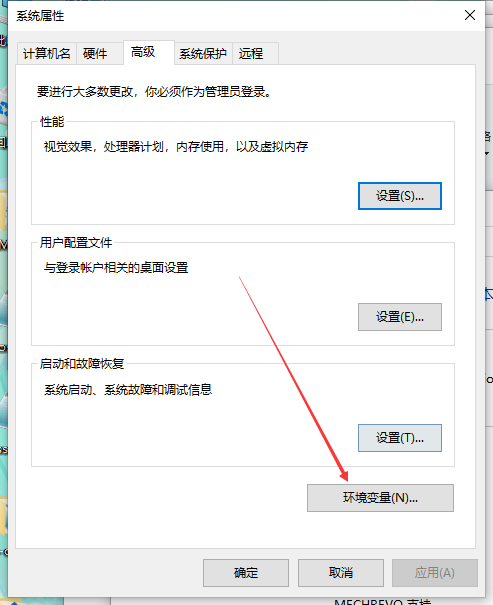
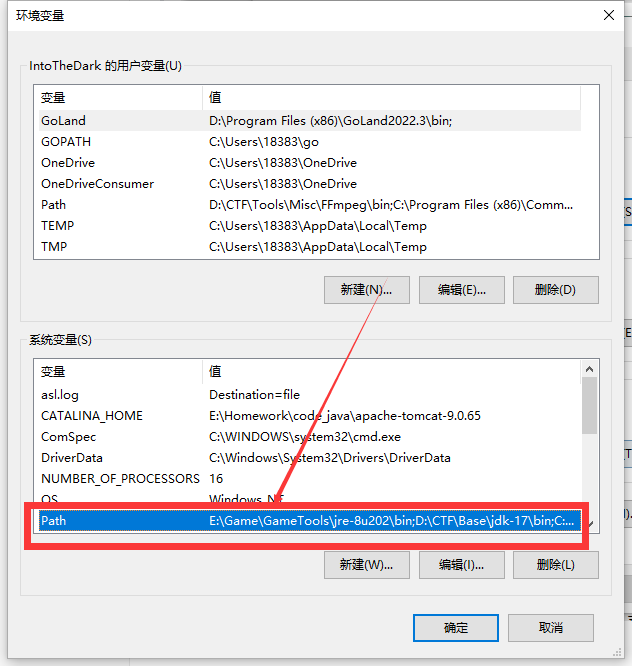
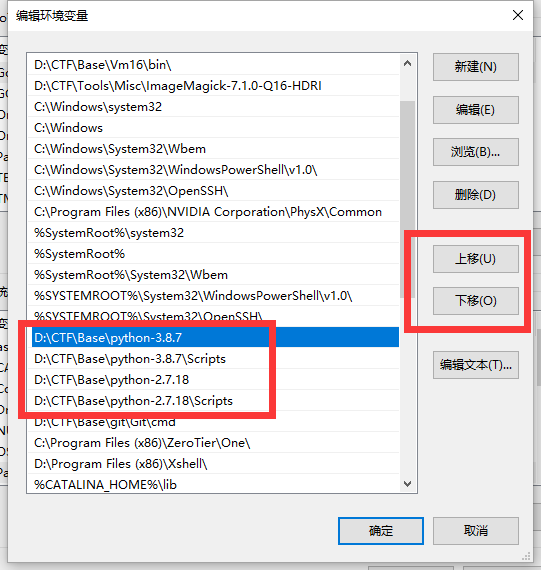
win切换环境变量:

image-20230106235037520

image-20230106235113339

image-20230106235133388

image-20230106235159997

image-20230106235227803

Scripts文件夹内为pip,根目录下是python,当移动版本优先级时需要同步移动。

linux更换软连接:

1
2
3
4
5
6
7
8
# 删除python软链接
$ rm -rf /usr/bin/python
# 删除pip软链接
$ rm -rf /usr/bin/pip
# 添加python3的软链接
$ ln -s /usr/local/python3.8.7/bin/python3.8 /usr/bin/python3.8.7
# 添加 pip3 的软链接
$ ln -s /usr/local/python3.8.7/bin/pip3.8 /usr/bin/pip3.8.7

当需要使用python自带的虚拟环境库的环境:需要较为干净的环境打包软件

1
2
3
4
5
6
7
8
9
10
安装virtualenv库:
$ pip3 install virtualenv
# 以当前主机py版本新建虚拟环境:
$ virtualenv test1
# 以指定版本新建虚拟环境(~~前提你得有~~
$ virtualenv -p /usr/bin/python3.8.7 test2
# 进入虚拟环境:
$ source test2/bin/activate
# 退出虚拟环境:
$ deactivate

以编译方式安装python:

1
2
3
4
5
6
7
8
9
10
11
12
13
14
15
16
17
18
# ubuntu live server安装换源:
https://mirrors.tuna.tsinghua.edu.cn/ubuntu
# ubuntu20.04 LTS换清华源:
$ vim /etc/apt/sources.list
deb https://mirrors.tuna.tsinghua.edu.cn/ubuntu/ focal main restricted universe multiverse
# deb-src https://mirrors.tuna.tsinghua.edu.cn/ubuntu/ focal main restricted universe multiverse
deb https://mirrors.tuna.tsinghua.edu.cn/ubuntu/ focal-updates main restricted universe multiverse
# deb-src https://mirrors.tuna.tsinghua.edu.cn/ubuntu/ focal-updates main restricted universe multiverse
deb https://mirrors.tuna.tsinghua.edu.cn/ubuntu/ focal-backports main restricted universe multiverse
# deb-src https://mirrors.tuna.tsinghua.edu.cn/ubuntu/ focal-backports main restricted universe multiverse
deb https://mirrors.tuna.tsinghua.edu.cn/ubuntu/ focal-security main restricted universe multiverse
# deb-src https://mirrors.tuna.tsinghua.edu.cn/ubuntu/ focal-security main restricted universe multiverse
# pip3换源
mkdir ~/.pip
vim ~/.pip/pip.conf
[global]
index-url = https://pypi.tuna.tsinghua.edu.cn/simple
trusted-host = pypi.tuna.tsinghua.edu.cn
1
2
3
4
5
6
7
8
9
10
11
12
# 镜像网站下载python3.8.7源码包
$ wget http://npm.taobao.org/mirrors/python/3.8.7/Python-3.8.7.tgz
# 解压安装包
$ tar -zxvf Python-3.8.7.tgz
# 切换目录
$ cd Python-3.8.7
# 创建安装目录
$ mkdir -p /usr/local/python3.8.7
# 顺序执行以下安装指令
$ ./configure --prefix=/usr/local/python3.8.7 --enable-optimizations
$ make
$ make install

当需要大型项目需要多个组件版本控制的情景时:作品赛

1
2
3
4
5
6
7
8
# 创建一个名为py38的环境,指定Python版本是3.8
conda create --name py38 python=3.8
# 进入创建的虚拟环境
conda activate py38
# 返回基础环境
conda deactivate py38
# 销毁创建的虚拟环境
conda remove --name py38 --all

后端开发举例-flask

安装

1
2
# 安装flask
pip install flask
1
2
3
4
5
6
7
8
9
10
# 最小的flask应用
from flask import Flask
app = Flask(__name__)

@app.route('/')
def hello_world():
return 'Hello, World!'

if __name__ == '__main__':
app.run(host="0.0.0.0",port="80",debug=True)

修改开发模式配置

安装gevent库

1
pip install gevent
1
2
3
4
5
6
7
8
9
10
11
12
# 最小的flask应用
from flask import Flask
from gevent import pywsgi
app = Flask(__name__)

@app.route('/')
def hello_world():
return 'Hello, World!'

if __name__ == '__main__':
server = pywsgi.WSGIServer(('0.0.0.0', 80), app)
server.serve_forever()

创建响应路由

添加路由相关的方法即可

1
2
3
4
5
6
@app.route('/user/<name>')
def hello_user(name):
if name =='admin':
return redirect(url_for('hello_admin'))
else:
return redirect(url_for('hello_guest', guest = name))

Flask模板页面

1
2
3
4
5
6
7
8
9
10
11
12
13
14
<!DOCTYPE html>
<html lang="en">
<head>
<meta charset="UTF-8">
<title>Title</title>
</head>
<body>
我的模板html内容
<br />{{ my_str }}
<br />{{ my_int }}
<br />{{ my_array }}
<br />{{ my_dict }}
</body>
</html>
1
2
3
4
5
6
7
8
9
10
11
12
13
14
15
16
17
18
19
20
21
22
23
from flask import Flask, render_template

app = Flask(__name__)

@app.route('/')
def index():
# 往模板中传入的数据
my_str = 'Hello Word'
my_int = 1
my_array = [1, 2, 3, 4, 5, 6]
my_dict = {
'name': 'xiaoming',
'age': 18
}
return render_template('hello.html',
my_str=my_str,
my_int=my_int,
my_array=my_array,
my_dict=my_dict
)

if __name__ == '__main__':
app.run(host="0.0.0.0",port="80",debug=True)

Cookie处理

1
2
3
4
5
6
7
8
9
10
11
12
13
14
15
16
17
18
19
20
21
22
23
24
from flask import Flask, make_response, request # 注意需导入 make_response

app = Flask(__name__)

@app.route("/set_cookies")
def set_cookie():
resp = make_response("success")
resp.set_cookie("uuid", "XJUSEC",max_age=3600)
return resp

@app.route("/get_cookies")
def get_cookie():
cookie_1 = request.cookies.get("uuid") # 获取名字为uuid对应cookie的值
return cookie_1

@app.route("/delete_cookies")
def delete_cookie():
resp = make_response("del success")
resp.delete_cookie("uuid")

return resp

if __name__ == '__main__':
app.run(host="0.0.0.0",port="80",debug=True)

HTTP方式

表单页面:

1
2
3
4
5
6
7
8
9
10
11
12
13
14
15
16
17
18
19
20
21
<!DOCTYPE html>
<html>
<head>
<meta charset="utf-8">
<title>Flask连接Mysql</title>
</head>
<body>
<h1>GET方法</h1>
<form action = "/get" method = "get">
<p>输入id</p>
<p><input type = "text" name = "id" /></p>
<p><input type = "submit" value = "submit" /></p>
</form>
<h1>POST方法</h1>
<form action = "/post" method = "post">
<p>输入id</p>
<p><input type = "text" name = "id" /></p>
<p><input type = "submit" value = "submit" /></p>
</form>
</body>
</html>

flask程序

1
2
3
4
5
6
7
8
9
10
11
12
13
14
15
16
17
18
19
20
21
from flask import Flask,request, render_template
from gevent import pywsgi
app = Flask(__name__)

@app.route('/')
def hello_world():
return render_template("index.html")

@app.route('/get',methods = ['GET'])
def get():
id = request.args.get('id')
return 'The id is '+id

@app.route('/post',methods = ['POST'])
def post():
id = request.form['id']
return 'The id is '+id

if __name__ == '__main__':
server = pywsgi.WSGIServer(('0.0.0.0', 80), app)
server.serve_forever()

重定向

1
2
3
4
5
6
7
8
@app.route('/')
def hello_world():
# 重定向至"/success"
return redirect(url_for('success'))

@app.route('/success')
def success():
return 'redirected successfully'

接收文件

1
2
3
4
5
6
7
8
9
10
11
<html>
<head>
<title>Flask文件上传</title>
</head>
<body>
<form action="/upload" method="POST" enctype="multipart/form-data">
<input type="file" name="file" />
<input type="submit" value="提交" />
</form>
</body>
</html>
1
2
3
4
5
6
7
8
9
10
11
12
13
14
15
16
17
18
19
20
from flask import Flask,render_template,request
from werkzeug.utils import secure_filename
import os

app = Flask(__name__)
app.config['UPLOAD_FOLDER'] = 'upload/'

@app.route('/')
def hello_world():
return render_template("index.html")

@app.route('/upload',methods = ['GET','POST'])
def get():
f = request.files['file']
print(request.files)
f.save(os.path.join(app.config['UPLOAD_FOLDER'], secure_filename(f.filename)))
return 'file uploaded successfully'

if __name__ == '__main__':
app.run(host="0.0.0.0",port="80",debug=True)

连接数据库

该功能大体目录结构如下:

1
2
3
4
5
6
7
|_ __init__.:py自定义库的标志文件,内容为空
|_ Main.py:flask入口
|_ SqlUtils.py:pymysql库的相关方法封装
|_ templates:放置模板组件,用于显示
|_ index.html:主页,用于选功能
|_ get.html:查询页面的表单
|_ result.html:显示查询结果的页面

Sql的查询举例:

1
2
3
4
5
6
7
8
9
10
11
12
13
14
15
16
17
18
19
20
21
22
23
24
25
26
27
import pymysql
def connect_sql(database):
# 打开数据库连接
db = pymysql.connect(host='localhost',user='root',password='intothedark',database=database)
# 使用 cursor() 方法创建一个游标对象 cursor
cursor = db.cursor()
# 使用 execute() 方法执行 SQL
cursor.execute("show tables")
# 把结果赋值给table_list
table_list = [tuple[0] for tuple in cursor.fetchall()]
message = "database_name is "+database + ",there are "+str(len(table_list)) + " tables. their names are "
for i in table_list:
message = message +i + " "
print(message)
return db

def get_data(database,table,col,data,aim):
# 调用数据库连接方法
db = connect_sql(database)
# 使用 cursor() 方法创建一个游标对象 cursor
cursor = db.cursor()
# 使用 execute() 方法执行 SQL
cursor.execute("select "+aim + " from "+table+" where "+col+" = "+data)
results = cursor.fetchall()
for row in results:
result = row[0]
return result

前端框架bootstrap举例

该项目主要以htlm、css、js为主,用于搭建简易前端项目,在此赘述的原因是用于演示前端框架的组件使用,个人体验下来该框架更加适合组件的应用。以下开始初步介绍小型项目的前端开发流程:

安装bootstrap

bootstrap官方提供了cdn,可以直接引用

1
2
3
4
5
6
7
8
<!-- 最新版本的 Bootstrap 核心 CSS 文件 -->
<link rel="stylesheet" href="https://stackpath.bootstrapcdn.com/bootstrap/3.4.1/css/bootstrap.min.css" integrity="sha384-HSMxcRTRxnN+Bdg0JdbxYKrThecOKuH5zCYotlSAcp1+c8xmyTe9GYg1l9a69psu" crossorigin="anonymous">

<!-- 可选的 Bootstrap 主题文件(一般不用引入) -->
<link rel="stylesheet" href="https://stackpath.bootstrapcdn.com/bootstrap/3.4.1/css/bootstrap-theme.min.css" integrity="sha384-6pzBo3FDv/PJ8r2KRkGHifhEocL+1X2rVCTTkUfGk7/0pbek5mMa1upzvWbrUbOZ" crossorigin="anonymous">

<!-- 最新的 Bootstrap 核心 JavaScript 文件 -->
<script src="https://stackpath.bootstrapcdn.com/bootstrap/3.4.1/js/bootstrap.min.js" integrity="sha384-aJ21OjlMXNL5UyIl/XNwTMqvzeRMZH2w8c5cRVpzpU8Y5bApTppSuUkhZXN0VxHd" crossorigin="anonymous"></script>

选定布局

在开发页面之前首先要决定页面的布局,一般的前端框架会提供不同的容器格式,如bootstrap的:

.container 类用于固定宽度并支持响应式布局的容器。

1
2
3
<div class="container">
...
</div>

.container-fluid 类用于 100% 宽度,占据全部视口(viewport)的容器。

1
2
3
<div class="container-fluid">
...
</div>

只有这两种那么我们可以组合成以下样式的页面:

1

填组件写脚本

这段内容不进行赘述,直接演示即可。该放按钮放按钮,该写脚本写脚本,该写路由写路由。

将人工智能、前端、后端结合起来的项目演示

准备环境

conda create --name py38 python=3.8

pip install -r requirements.txt

下载yolov5预训练模型放至根目录下

模型测试

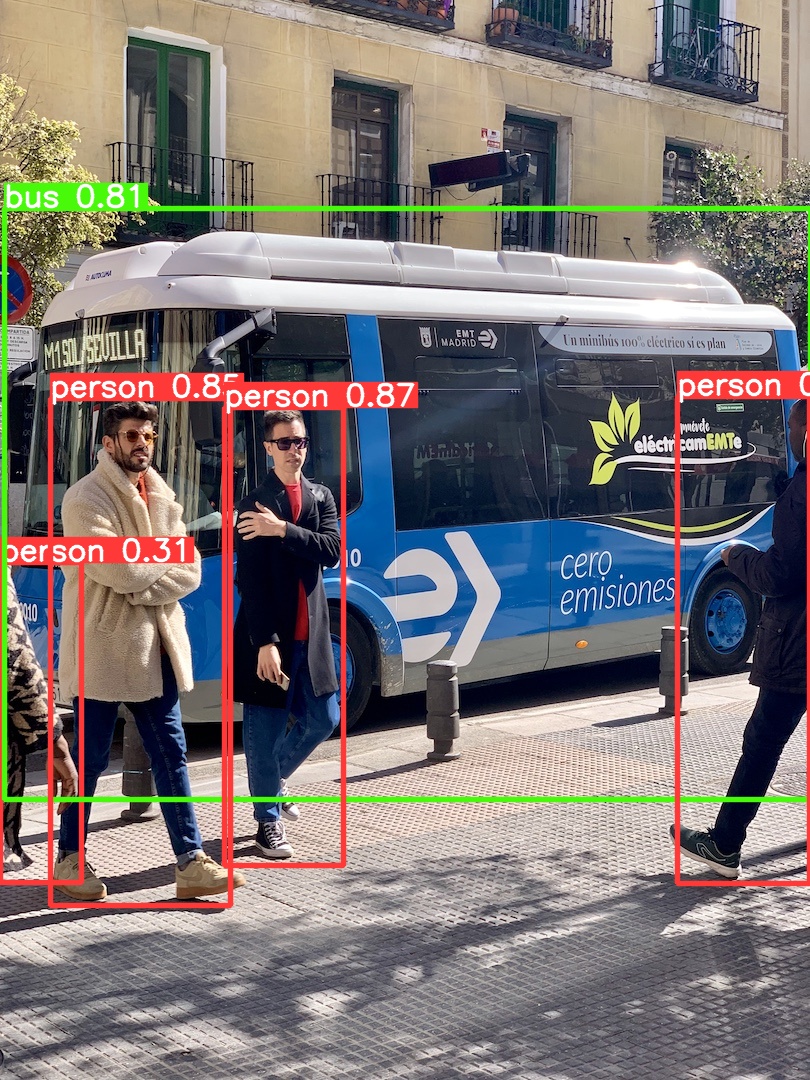
python detect.py --source ./data/images/bus.jpg
bus

可以看到成功输出了图片

使用flask调用模型(os直接简单粗暴的调用

修改模型的图片保存地址

1
2
3
4
#将67行改为
save_dir = Path(project) / name #increment_path(Path(project) / name, exist_ok=exist_ok) # increment run
#将86行改为
parser.add_argument('--project', default=ROOT / '../flask/static', help='save results to project/name')

flask的文件处理部分改为

1
2
3
4
5
6
7
@app.route('/upload',methods = ['GET','POST'])
def get():
f = request.files['file']
print(request.files)
f.save("./upload/"+f.filename)
os.system("python ../yolov5-master/detect.py --source ./upload/"+f.filename)
return render_template('index.html',Imgsrc='./result/'+f.filename)